/icon.png)
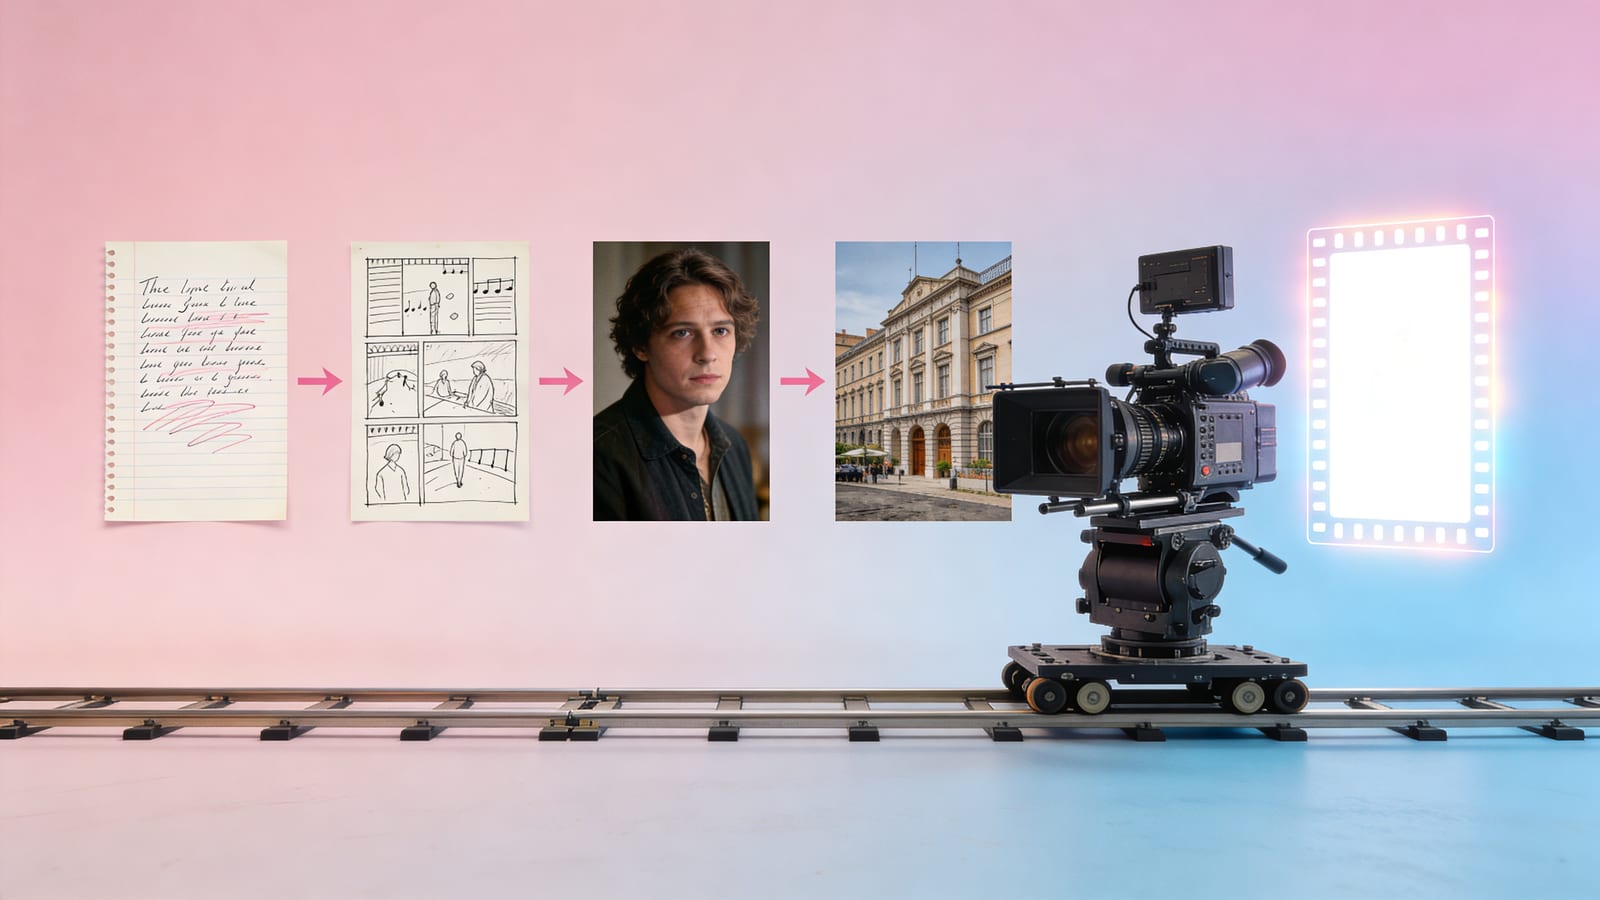
Suno गीत से एक समाप्त Film तक: AI संगीत वीडियो के लिए Complete Storyboard Workflow (Lyrics to Shots to Characters to Scenes to Camera to Export)

एक-sentence takeaway
Suno एक गीत को 30 सेकंड में spit करता है, लेकिन उस गीत को एक music video में बदलना जो एक “AI collage” की तरह नहीं दिखता यह fancier prompts तक नहीं बल्कि एक storyboard pipeline तक सीमित है जो labour को एक film crew की तरह divide करता है। यह guide पूरी process को string करता है — lyrics से finished film तक, 6 stages, प्रत्येक एक method के साथ और matching tool SunoMV के अंदर।
अंत तक आप जान जाएँगे: अधिकतर AI music videos “pages फ्लिप करने वाले slideshow” की तरह क्यों दिखते हैं; एक complete “lyrics से shots से characters से scenes से camera को export” workflow क्या दिखता है; और कौन सी feature use करें और कौन सी deep-dive method हर stage के लिए read करें।
अधिकतर AI music videos “pages फ्लिप करने वाले slideshow” की तरह क्यों दिखते हैं
Lyrics को एक image generator में drop करें, एक image per line, उन्हें stitch करें — यह है कि अधिकतर लोग एक AI music video कैसे बनाते हैं, और यह है कि अधिकतर उन्हें cheap क्यों दिखता है:
- Visuals music से out of sync: transitions beat को hit नहीं करते, और chorus का emotional peak एक flat image के साथ pair होता है;
- Flat camera language: पूरे में एक shot size और एक camera angle, कोई push, pull, pan, या tracking नहीं — एक slideshow की तरह;
- Characters और scenes drift: last shot का lead इस shot में एक नया face है, और living room एक different living room में बदल जाता है;
- कोई narrative arc नहीं: 90 seconds में setup, development, turn, या resolution नहीं — सिर्फ good-looking single frames का एक pile।
इनमें से कोई भी “writing better prompts” से solve नहीं किया जा सकता, क्योंकि वे single-image problems नहीं हैं — वे process problems हैं। Real fix यह है कि एक music video बनाने को एक pipeline के रूप में treat करें divided labor के साथ — बिल्कुल जो film crews दशकों से करते आए हैं, except अब हर role के पास एक tool है।
Complete workflow: एक 6-stage overview
| Stage | क्या करता है | Problem जो solve करता है | Deep-dive method |
|---|---|---|---|
| 1. Lyrics से shot list | Lyrics को rhythm द्वारा individual shots में cut करें | Visuals music को follow करते हैं evenly cut किए जाने के बजाय | The Lyric-Driven Shot List Method |
| 2. Shots से storyboard | Hर shot के लिए shot size, camera angle, और visual content set करें | Camera language अब flat नहीं है | The Shot-by-Shot Storyboard Method |
| 3. Character lock | Lead के face को एक reference image के साथ lock करें | Lead shots के बीच change नहीं होता | The 4-Step Character Consistency Method |
| 4. Scene lock | Location और set को एक scene library के साथ lock करें | Location shots के बीच drift नहीं होता | The Scene Consistency Method |
| 5. Camera + transitions | Stills को camera movement add करें, shots के बीच transitions add करें | Visuals move और beat पर land करते हैं | नीचे देखें |
| 6. Export | Subtitles, compositing, export | One-click finished film | नीचे देखें |
चलिए इसे stage by stage तोड़ते हैं।
Stage 1: Lyrics से shot list (rhythm first, visuals second)
Shots को evenly by sentence cut न करें। Musical structure और emotion द्वारा cut करें: verse narrates करता है, chorus erupts करता है, bridge turns करता है। Hर shot lyrics के एक stretch + एक emotional beat में map होता है। यह step पूरे music video की rhythmic skeleton set करता है — visuals music को follow करते हैं, music visuals को नहीं।
Deep dive के लिए, The Lyric-Driven Shot List Method और Narrative Arc Design देखें।
Stage 2: Shots से storyboard (hर shot को एक language दें)
एक shot list hand में होने के साथ, hर shot के लिए तीन चीजें set करें:
- Shot size: एक wide shot environment को establish करता है, एक medium shot emotion देता है, एक close-up detail देता है;
- Camera angle: eye level, high angle, low angle — angle एक attitude है;
- Visual content: इस shot में specifically क्या होता है।
Shot size और camera angle में variation हर music video को “pages फ्लिप करने वाले slideshow” की तरह नहीं दिखने की key है। The Shot-by-Shot Storyboard Method देखें।
Stage 3: Character lock (person को swap न करें)
अपने lead को एक reference image feed करें और पूरे music video का lead lock हो जाता है। Multiple characters (lead + supporting) के लिए, हर एक के लिए एक image upload करें, और @character-name को एक per-shot prompt में use करें specify करने के लिए “कौन इस shot में दिखाई देता है।” यह AI music video में hardest और सबसे critical hurdle है — यदि face breaks, पूरी film wasted है।
पूरे method के लिए, How to Keep Characters Consistent in AI Music Videos देखें।
Stage 4: Scene lock (place को swap न करें)
Character lock “who” को handle करता है; scene lock “where” को handle करता है। 3-5 scenes का एक छोटा library build करें, प्रत्येक एक या दो sentences के description के साथ (location + time of day + set + light), और किसी भी location के लिए एक reference image add करें जिसे आप welded down करना चाहते हैं। फिर hर shot को library से एक single-select scene दें।
यह stage अधिकतर workflows को skip करता है, और यह “one world” feel का source है। पूरे method के लिए, The AI Music Video Scene Consistency Method देखें।
Stage 5: Camera + transitions (visuals को move करें और beat पर land करें)
एक still अपने आप से dead है। दो चीजें इसे life में लाती हैं:
- Camera movement: एक Ken Burns-style push, pull, pan, या track को एक still में add करें, और एक single image को breathing का एक sense मिलता है;
- Transition video: दो adjacent shots के बीच एक stretch के बीच एक transition generate करें ताकि cut hard न हो — और यह drum hit / beat पर land कर सके।
Music के strong beats पर transitions को placing करना “syncing visuals से music” के लिए key move है।
Stage 6: Export (subtitles + compositing + export)
Last step: lyric subtitles को align करें, सभी shots + transitions को composite करें, और finished film को एक click में export करें। जब आपके पास lyrics हों, word-by-word alignment use करें ताकि subtitles हर word पर land करें।
कौन सी SunoMV feature प्रत्येक stage को use करती है
यह workflow आपको सात या आठ tools के बीच shuffle नहीं करवाता — SunoMV छह stages को एक single shot editor में build करता है:
| Stage | Matching feature |
|---|---|
| Lyrics से shot list | एक Suno link paste करें; यह automatically lyrics द्वारा shots cut करता है और एक shot list produce करता है |
| Shots से storyboard | Shot size / camera angle / visual prompt को per shot set करें |
| Character lock | Character reference images (up to 3) + per-shot @character-name specification |
| Scene lock | Scene library (up to 5) + single-select एक scene per shot |
| Camera + transitions | Per-shot camera movement + shots के बीच transition video |
| Export | Subtitle alignment + compositing + export |
आप audio-to-video generator के through enter करते हैं, एक Suno गीत paste करते हैं, और एक finished film तक इस pipeline को follow करते हैं।
FAQ
क्या Suno music videos बना सकता है? Suno itself गीत producing पर focus करता है, और इसकी built-in visualization काफी basic है। एक “real” music video बनाने के लिए storyboarding, consistent characters, और एक unified scene के साथ, आपको Suno गीत के ऊपर storyboard workflow की एक layer की जरूरत है — बिल्कुल जो एक tool जैसे SunoMV करता है: एक Suno link paste करें और इस article की pipeline को एक finished film तक follow करें।
मैं एक Suno गीत को एक music video में कैसे बदलूँ? Shortest path: एक Suno link paste करें -> auto-generate एक shot list -> अपने lead को एक reference image feed करें face को lock करने के लिए -> locations को lock करने के लिए कुछ scenes build करें -> shot by shot visuals generate करें -> camera movement और transitions add करें -> export करें। इस article के छह stages वह path expanded हैं।
एक को कितना लंबा लेता है? Skeleton (generating shot list + batch-generating visuals) मिनटों की बात है। जो actually लंबा लेता है वह “tuning” है — locking characters, locking scenes, picking camera moves, landing beat। कितना effort आप storyboarding और consistency में लगाते हैं यह directly decide करता है कि finished film “watchable” है या “looks real।”
क्या मुझे storyboarding/cinematography को know करने की जरूरत है इसे use करने के लिए? कोई professional background required नहीं। Tool hर shot के लिए एक shot size और camera angle recommend करता है, और आप वहाँ से fine-tune करते हैं। इस workflow की value यह है: यह दशकों के film crew के storyboarding experience को छह steps में turn करता है जिन्हें आप follow कर सकते हैं।
Process को चलाना शुरू करें
AI music videos बनाना “एक stronger model finding” के बारे में नहीं है — यह “process को सही लाना” के बारे में है। Lyrics rhythm set करते हैं, storyboard language set करता है, character face को lock करता है, scene location को lock करता है, camera movement इसे move करता है, और transitions इसे connect करते हैं — छह stages में से किसी एक को भी drop करें और finished film “real” का एक degree lose करता है।
SunoMV को open करें, अपना Suno गीत paste करें, shot list से शुरू करें, और इन छह steps को run करें। आप find करेंगे कि एक “respectable” AI music video बनाना कभी luck के बारे में नहीं था — यह process के बारे में है।
लोकप्रिय गाइड
- 01 Suno Prompts: genre के हिसाब से 30 copy-paste उदाहरण (2026)
- 02 अपने Suno गाने का Music Video कैसे बनाएं: बस लिंक पेस्ट करें (2026)
- 03 2026 में सच में Free 7 AI Music Generators (Suno, Udio, ACE-Step)
- 04 Suno v5 AI संगीत संपूर्ण गाइड (2026): खाली पन्ने से रिलीज़-तैयार सिंगल तक
- 05 Suno गाने Free में MP4 Video डाउनलोड करें: 3 तरीकों की तुलना (2026)
इस सीरीज़ में और
- AI लिरिक्स वीडियो मेकर के लिए संपूर्ण गाइड: मुफ़्त ऑनलाइन टूल्स और 2026 में SunoMV वर्कफ़्लो
- शब्द-दर-शब्द सिंक किए गए गीत वीडियो (2026): कराओके गीत जो कभी अलग न हों — SunoMV गाइड
- गीत-संचालित MV आख्यान चाप विधि: पाठ से SunoMV शॉट अनुक्रम (2026)
- AI संगीत Visualizer वर्कफ़्लो: SunoMV विधि Lyrics से Storyboard से Visual लय 2026
- वर्स-कोरस-ब्रिज शॉट रोटेशन विधि (2026): अपने एआई एमवी की विजुअल संरचना को अपने गीत संरचना से 1:1 संरेखित करें